September 24, 2017

Run task manager minimized automatically at login time on Windows 10

GOAL

Run task manager automatically at login, minimized on Windows 10

DETAILS

Unlike other versions of Windows, since Win8, putting short-cut of task manager in Start folder won't work as it requires elevated access.

STEPS


  1. Create a batch file with below content, and store it in somewhere like "c:\bin\":

    start /min taskmgr
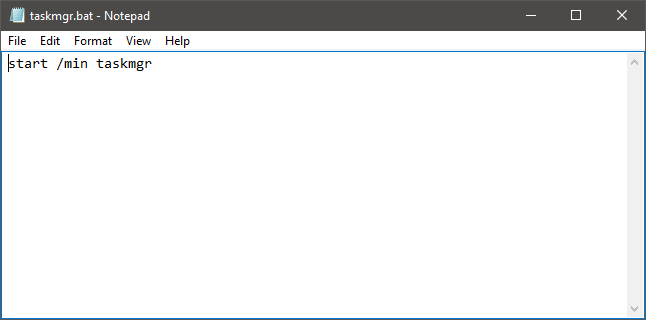
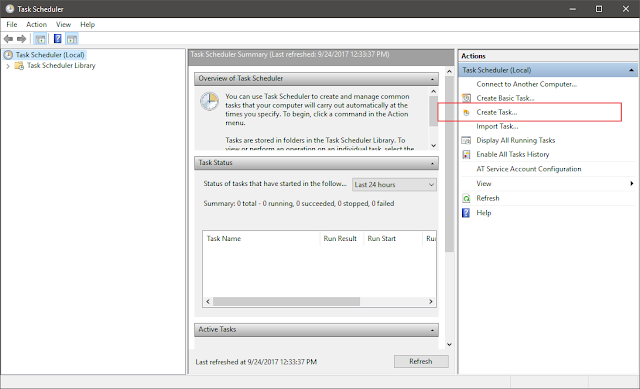
  2. From task bar, type in "Task Scheduler", click on "Create Task..."


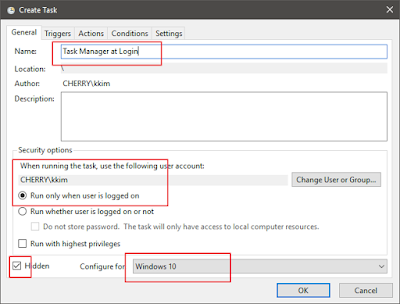
  3. On "General" tab, enter name like "Task Manager at Login".  Select user account, check off "Hidden", and select "Windows 10" then click Ok button.

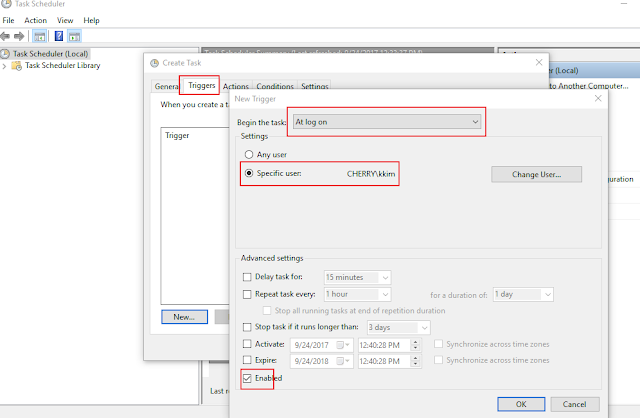
  4. On "Triggers" tab, select "At log on", select user setting (in my case only myself), and check off "enabled", then click Ok.

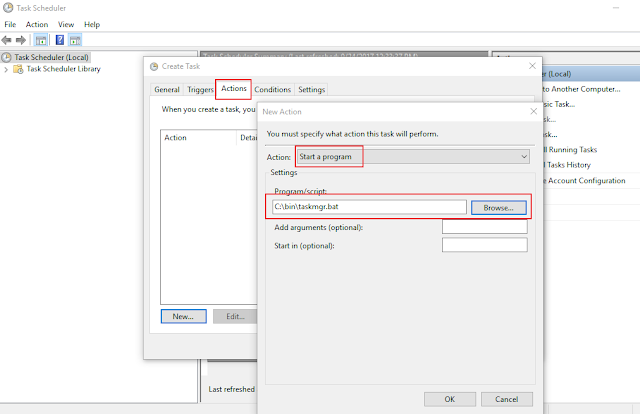
  5. On "Actions" tab, select "Start a program" for Action, then choose the batch file in Program/script.  Then click Ok.


July 14, 2017

Clear DNS cache in Chrome and Windows


Chrome

In Chrome URL field, type in:
chrome://net-internals/#dns

And click on <Clear host cache> button.

Windows

Open CMD with Admin privilege and type in:

ipcnofig /flushdns

March 12, 2017

SSL for Raspberry Pi Nginx server with dynamic IP and Custom Domain

This posting is about how to host your own Raspberry Pi web server at home with dynamic IP with custom domain and SSL.

I tried many different methods and different ways to install certbot, but on RPi Raspbian Jessie Lite, this is the only way.

Goal

Host own web site(s) on Raspberry pi, with custom domain from home, and support SSL.

Environment

  • Raspberry pi + Raspbian Jessie Lite
  • Fast internet
  • Your ISP allows port 80 and 443
  • Own domain and you can edit DNS

Prep-work

  1. Set up Raspberry pi with static IP, and configure your router to port forward to your RPi web server, port 80 and 443(SSL) 
  2. Set up custom domain with dynamic IP.  Make sure you have correct settings in DNS set up.
  3. Set up Nginx on RPi

Set up SSL on RPi  

  • You have to do above prep-work before follow below steps.
  • It is assumed your web site's root doc directory is: /var/www/mysite/
  • It is assumed your custom domain is: www.mydomain.com
  • Nginx is up and running, and accessible by the custom domain.

STEPS:

March 11, 2017

Custom domain and dynamic IP

Goal

Make home Raspberry Pi server accessible from outside with custom domain.

Environment

  • Raspberry Pi with Raspbian Jessie Lite
  • High speed internet at home (e.g. Fios), dynamic IP
  • Appropriate ports are open: 80, 443, 23, etc.
  • Own domain and access to DNS setting


Steps

March 10, 2017

Raspberry Pi mount exFAT Flash Drive as storage

Goal

Mount USB flash drive to RPi.

I can use large SD card, but:
(1) I already have a small SD card I want to re-use, and want to separate OS and data.
(2) I want to back up/store from Windows for data files.
(3) large capacity flash drive is cheap.

Environment

  • Windows 10 64bit
  • RPi, Raspbian Jessie Lite

March 8, 2017

Post Raspberry Pi status on Twitter

Goal

Tweet RPi (and CHIP) status with temperature, external IP, etc.

Environment

  • Raspbian Jessie Lite
  • Python 2.7

Prepare Twitter Account

A Twitter account is needed to publish the status, and set it to private unless you want to make postings public.
  1. Register Twitter account
  2. Log on to Twitter with the account.
  3. Go to https://twitter.com/settings/account
  4. Change setting in Privacy and safety, Email notification, 
  5. Go to https://apps.twitter.com/
  6. Create New App and get following:
    • Consumer Key (API key)
    • Consumer Secret (API Secret)
    • Access Token
    • Access Token Secret
From your regular Twitter account, follow above account.

March 1, 2017

Setting up Raspberry Pi, wifi, static IP


Goal

Set up headless RPi, Wifi with static IP.

Environment

  • Windows 10 64bit
  • Raspberry Pi 1A, 1B, 3B, Zero
  • External monitor, powered USB hub, wifi dongle, keyboard/mouse.
  • RPi OS; Raspibian Jessie Lite 

Although I will be using RPi headless, the easiest way to set up is hook up external monitor, powered USB hub, connect keyboard mouse + wifi module.  I tried different headless set up, but they all were too inconvenient, especially with RPi models with only one USB port.


Install/Setup Raspberry Pi on SD

  1. Raspberry Pi OS download: https://www.raspberrypi.org/downloads/
  2. I got the easy one, Raspbian Jessie Lite, https://www.raspberrypi.org/downloads/raspbian/
  3. Use Win32 Disk Image to write the OS onto SD card https://sourceforge.net/projects/win32diskimager/ 

Setting up RPi

February 18, 2017

C.H.I.P. headless set up on Windows 10

CHIP Spec

CHIP is $9 computer with following specs:


  • 1GHz R8M/R8 ("A13 compatible, Cortex-A8 is ARMv7-A,  CPU single core")
  • 512MB RAM
  • Built-in 4GB storage, OS pre-installed.
  • 5V DC, >500mA
  • Built-in WIFI (B/G/N), Bluetooth 4.0
  • Micro USB on the go port, full USB port
  • 45 GPIO
  • Suppports: 1-wire, I2C, and PWM output

Connect to Windows 10 via USB

To connect to monitor, a separate adapter is required and no Ethernet port.  Follow below steps to set up headless.
  1. Connect micro-USB to Windows 10 PC
  2. Open device manager.  You'll find "CDC Composite Gadget" with exclamation point, meaning no driver is installed.  If you don't see this, that's good.  If you see this go to next step.
  3. Right mouse click on "CDC Composite Gadget"
  4. Properties -> Update driver -> browse -> Let me pick -> ports -> Microsoft -> USB Serial device.

Connect to CHIP via Serial

You'll now see new COM port.  Follow this to connect to CHIP via serial port you just setup:
  1. In putty, click on "Session" in left panel under Category.   select "Serial" for connection type, and in Serial line field, type in the COM port that was set up in previous step.  E.g. "COM4", and speed=9600. 
  2. Click on "Open" button.
  3. ID/PW= chip/chip or, root/chip

Set up WIFI

  1. login as root
  2. type "nmtui"
  3. Choose "Activate a connection"
  4. Choose wifi, enter password
  5. reboot
To set static IP, run nmtui again and edit the connection.

No GUI

CHIP's pre-installed OS has GUI running.  You can VNC to it, or disable the GUI and just use SSH or serial:
  • Disable GUI: systemctl set-default multi-user.target
  • Enable GUI: systemctl set-default graphical.target

Setting Locale, Timezone

  1. apt-get update
  2. apt-get install locales
  3. locale-gen en_US en_US.UTF-8
  4. dpkg-reconfigure locales
  5. dpkg-reconfigure tzdata

Slow WIFI

  1. sudo apt-get install wireless-tools
  2. iwconfig wlan0 power off
Automate this:
  1. sudo wget -O/etc/network/if-up.d/wlan_pwr http://fordsfords.github.io/wlan_pwr/wlan_pwr
  2. sudo chmod +x /etc/network/if-up.d/wlan_pwr
  3. sudo reboot

Install Java

Download ARM version from http://www.oracle.com/technetwork/java/javase/downloads

Install Webmin

  1. sudo vi /etc/apt/sources.list
  2. Add these two lines:
    deb http://download.webmin.com/download/repository sarge contrib
    deb http://webmin.mirror.somersettechsolutions.co.uk/repository sarge contrib
  3. wget http://www.webmin.com/jcameron-key.asc
  4. sudo apt-key add jcameron-key.asc
  5. sudo apt-get update
  6. sudo apt-get install webmin


RESOURCES


January 14, 2017

Using Korean input/output with Windows' console (cmd)


Environment: Windows 10 64-bit, English version.  Installed Korean IME.


Summary

If file names are in Korean (e.g. downloaded files), Windows can display the Korean file name in Explorer without any problem, but it will not display the file name properly.  And, you can't enter Korean in cmd.

[1] only displaying is needed
Go to this page, http://fightingmamoru.tistory.com/49
Download the font and install it, and then in cmd, change the font to "Bitstream Vera Sans Mono"

[2] both displaying and entering is needed
Go through above step [1], and install ConEmu (https://www.fosshub.com/ConEmu.html), change the font as in step [1].


January 4, 2017

Installing Python 2 and 3 together on Windows 10 with Eclipse Pydev


I already have Python 2.7 on Windows 10, and needed Python 3.x keeping 2.7.  This method works fine with Eclipse Pydev as well.  There are other ways to do have Python 2 and 3 together in Windows system, but I found this way is the simplest and easiest.

Environment:
Windows 10 64-bit. Python 2.7 64-bit, Eclipse+Pydev are already installed.

Steps:

  1. Download Python 3.x 64-bit (Windows Installer) -- same for 32-bit.
    NOTE: as of today (2017/1/4), it's better to install Python 3.5 (https://www.python.org/downloads/release/python-352/), not the latest 3.6, since TensorFlow is now available for Windows but it only installs with python 3.5, not 3.6.
  2. Install it with default setting.  Do not add it to PATH.
  3. Run Eclipse
  4. Go to Windows -> Preferences -> Pydev -> Interpreters -> Python Interpreters, then click on "Quick Auto-config"
How to use it:
  • Python 3.6 for Windows installer installs it in:
    C:\Users\<USERNAME>\AppData\Local\Programs\Python\Python36\python.exe

    My Python 2.7 is installed in:
    C:\opt\Python27\python.exe

    Since the PATH is not added, if you type "python" in console, it's Python 2.7.
  • To use Python 2 or 3:
    • Python 2: py -2 <script name>
    • Python 3: py -3 <script name>
    • Python 2 PIP: py -2 -m pip install <module>
    • Python 3 PIP: py -3 -m pip install <module>
  • Eclipse-Pydev
    1. New Pydev project
    2. Set Grammar version
    3. Set Interpreter 

RESOURCES